Showing posts with label Texture Chic Designer Series Paper. Show all posts

Friday, August 16, 2024

In My Prayers

I think the bits of gold on the background places this card into the elegant category. What do you think? 


Stamps:
   Hope & Prayer

Paper:
   Soft Succulent A-2
   Basic Black 5-3/8 x 4-1/8
   Texture Chic DSP 5-1/4 x 4
   Pool Party - Negative from Framelit
   Basic White 5-1/4 x 4 (Inside)

Ink:
   Tuxedo Black Memento

Technique:
   CAS

Accessories:
   Framed Florets Dies (Negative Oval)
   Pool Party 3/8" Grosgrain Ribbon
   Dimensionals
   Glue Dot
   Adhesive

First, I adhered the Texture Chic DSP panel onto a Basic Black matte and then onto the Soft Succulent card front.

I then took the leftover Pool Party negative from a Framed Floret Die cut and stamped it, using Tuxedo Black Memento ink. If you don't have a negative piece to use, then create one and save the frame for another project, or use it on this one.

Next, I attached the oval to the center of the card front, using dimensionals.

I then tied some ribbon into a bow and attached it to the bottom of the oval, using a glue dot.

Lastly, I added a Basic White panel to the inside of the card.

Thank you for visiting. I do love company. Feel free to Contact Me if you have any questions.

Explore current products, promotions, and all of the opportunities. Just click on Shop Now. A HOST CODE is available in the right sidebar for those of you who do not earn your own rewards.

For those of you who like kits with everything you need to complete a project, we offer Paper Pumpkin. Your monthly cost is $25. Also, you might want to look at the new Kits Collection!

Join Me and become my newest team member. I look forward to meeting you.

Please take a minute to share, like, pin, tweet, or comment. Do not forget to FOLLOW and SUBSCRIBE to my blog.

HAPPY STAMPING!

Saturday, April 6, 2024

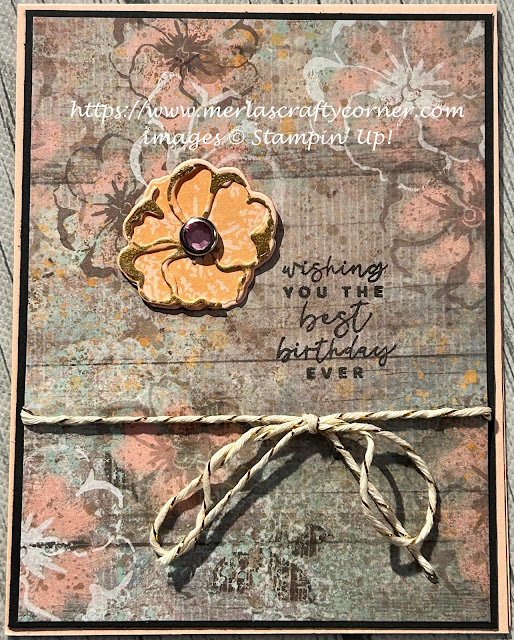
Birthday Season

I like how the images emerge from the designer series paper. I also like how all of the colors somewhat bleed onto each other. What do you think? 


Stamps:
   Season of Chic

Paper:
   Petal Pink A-2, Scraps
   Basic Black 5-3/8 x 4-1/8
   Texture Chic DSP 5-1/4 x 4
   Basic White 5-1/4 x 4 (Inside)

Ink:
   Petal Pink
   Tuxedo Black Memento
   Metallic Gold

Technique:
   Heat Embossing
   Die Cutting

Accessories:
   Gold Embossing Powder
   Season of Chic Dies
   21" Gold Baker's Twine
   Glue Dots
   Pink Circle Rhinestone Brads
   Adhesive

First, I stamped, heat embossed and die cut the flower. You can easily add more flowers on the card front if you like. I kept mine simple.

I then stamped the sentiment directly onto the DSP panel, using Tuxedo Black Memento ink. You can heat emboss this in gold as well.

Next, I attached the flower, using a Pink Circle Rhinestone Brad from my stash.

I then wrapped some Gold Bakers's Twine on the bottom of the sentiment and tied a bow on it.

Next, I adhered the DSP panel onto a Basic Black matte and then onto the Petal Pink card front.

Lastly, I adhered a Basic White panel to the inside of the card.

Thank you so very much for taking the time to stop and glance at my work. If you have any questions or suggestions, please Contact Me. I do appreciate your time.

If you need any supplies, or you are curious to know just how much these products cost, click on Shop Now and satisfy your curiosity. A HOST CODE is available for you to use in case you did not earn your own rewards. You can find it in the right sidebar.

Do you want the best value for your buck? Join Me and reap all of the rewards. I will be more than happy to assist you. Check it out and note that there are no hidden agendas.

Wait! Don't leave. If you just want to try it and see, then subscribe to Paper Pumpkin. You will receive a kit with everything you need to create a project. Check out the Kit Collection for more choices.

I would love for you to take a minute to share, like, pin, tweet, or comment. Please FOLLOW and SUBSCRIBE to my blog. Let me know what you think below in the comments.

HAPPY STAMPING!

Thursday, June 15, 2023

Textured Thanks

This Designer Series Paper (DSP) makes the card. The bits of gold make you want to reach out and touch it. Thoughts? 


Stamps:
   Teeny Tiny Wishes

Paper:
   Pool Party A-2
   Basic Black 5-3/8 x 4-1/8
   Texture Chic DSP 5-1/4 x 4
   Basic White 5-1/4 x 4 (Inside), Scraps
   Soft Succulent 3-1/2 x 2-1/2
   Soft Suede 2 x 3
   Gold Foil Paper Scraps

Ink:
   Tuxedo Black Memento

Technique:
   Die Cutting

Accessories:
   Stitched Shapes Framelits
   Cross of Hope Framelits
   Gingham Gala Sequins
   Basic Pearl Jewels
   Natural Finish Ribbon
   Glue Dots
   Dimensionals
   Adhesive

First, I die cut the Soft Succulent Oval and the Basic White circle, using the Stitched Shaped Framelits.

I then die cut the Soft Suede cross, using the Cross of Hope Framelits.

I stamped the sentiment on the Basic White stitched circle, and adhered the Natural Finish Ribbon around the DSP panel.

Next, I adhered the DSP panel onto the Basic Black matte, and then onto the Pool Party card front.

I adhered the cross onto the Soft Succulent oval and added it to the card front, using liquid adhesive.

I then layered the sentiment onto the bottom of the oval with a few dimensionals.

I grabbed some punched gold foil flowers from my stash and added a sequin to the center of them. These were added, using glue dots.

*Note, when I have small amounts of metallic paper left-over, I punch small shapes to use whenever I need them. The flowers were perfect for this card.

Lastly, I added a few pearls and adhered the Basic White panel to the inside of the card.

I am so excited that you stopped to read and check out my work. Thank you from the bottom of my heart. Contact Me and let me know if there is anything I can answer for you.

Do you have some time to browse? You do not want to pass up the opportunity to shop some quality products and see what is trending. Shop Now and take a peek. If you decide to place an order, I have included a HOST CODE in the right sidebar if you do not earn any rewards on your own. Thanks in advance.

Are you undecided? Subscribe to Paper Pumpkin and give it a go. Let the products speak for themselves. The cost is less than $25 and you are completely in control. No small print for you to miss. Try it.

Join Me and gain the best value for your hard-earned money. Check it out now.

Share, like, pin, tweet, or comment. Come on, I dare you. Don't forget to FOLLOW and SUBSCRIBE to my blog.

HAPPY STAMPING!

Tuesday, June 13, 2023

Manly Baptism

Check out this oval on its side. I like it. What do you think? 


Stamps:
   Blessed by God

Paper:
   Soft Succulent A-2, 3 x 2-1/4 Oval
   Basic Black 5-3/8 x 4-1/8
   Texture Chic DSP 5-1/4 x 4
   Basic White 5-1/4 x 4 (Inside)
   Gold Paper Scrap

Ink:
   Tuxedo Black Memento

Technique:
   Die Cutting

Accessories:
   Cross of Hope Framelits
   Framed Florets Dies
   Black Rhinestone Jewels
   Dimensionals
   Adhesive

First, I grabbed a Soft Succulent oval that I had in my stash of left-overs. It was left-over from a Framed Florets Die that I had cut for another card. This is the center of the frame. 

I then stamped the sentiment on the left side of the oval, using Tuxedo Black Memento.

I added a gold cross on the right of the sentiment. The cross was die cut, using the Cross of Hope Framelits. When I have small pieces of Metallic paper, I die cut or punch basic images like crosses, hearts, stars, and flowers. I keep them to use when I need a small embellishment. The cross was perfect in this case.

FYI: When the metallic piece is too small, I punch small circles to use in shaker cards. I know, I don't like to throw anything away...but I do find use for all my scraps!

Next, I adhered the DSP panel onto the Basic Black matte, and then onto the Soft Succulent card base.

I attached the oval, using dimensionals, in the center of the card.

Lastly, I added three Black Rhinestone Jewels and adhered the Basic White panel to the inside of the card.

Thank you for taking the time to read this. I try my best to keep it short and sweet. Contact Me if you have questions or need anything Stampin' Up!

Shop Now and take a peek at quality products. There is a HOST CODE if your product total is less than $150. You do not have to use it, but I would appreciate it. It is located in the right sidebar.

Join Me and become part of my team. I will be as involved as you like. Check out the advantages.

Are you curious, but undecided? Subscribe to Paper Pumpkin and try it. The kit will include everything you need, and it won't break the bank. Check out the Kit Collection for more all-inclusive kit choices.

Please share, like, pin, tweet, or comment. I would love for you to FOLLOW and SUBSCRIBE to my blog.

HAPPY STAMPING!

Sunday, June 4, 2023

Foiled Cross

The gold highlights on this Designer Series Paper (DSP) offered the perfect background for my golden cross. What do you think? 


Stamps:
   Teeny Tiny Wishes

Paper:
   Pool Party A-2
   Basic Black 5-3/8 x 4-1/8
   Texture Chic DSP 5-1/4 x 4
   Basic White 5-1/4 x 4 (Inside), Scrap
   Soft Succulent 3-1/2 x 2-1/2
   Gold Foil Paper Scraps

Ink:
   Tuxedo Black Memento

Technique:
   Die Cutting

Accessories:
   Stitched Shapes Framelits
   Cross of Hope Framelits
   Gingham Gala Sequins
   Basic Pearl Jewels
   Natural Finish Ribbon
   Glue Dots
   Dimensionals
   Adhesive

First, I cut my DSP panel and wrapped 6" of the Natural Finish Ribbon around the lower third of the panel. I used Stampin' Seal+ to adhere it to the DSP.

I then adhered this panel onto the Basic Black matte and then onto the Pool Party card front.

I stamped a small scrap of Basic White with my sentiment, using Teeny Tiny Wishes. You can change the sentiment to suit your needs.

Next, I die cut a stitched oval from the Soft Succulent paper, and a white stitched circle, using the Stitched Shapes Framelits. I did make sure the sentiment was centered on the circle die cut.

I also die cut a gold cross, using the Cross of Hope Framelits. You can punch out small shapes from the left-over gold pieces. I had a few gold flower shapes in my stash that had been punched from previous scraps of gold.

I then adhered the gold cross to the center of the Soft Succulent oval and attached it to the card front.

Next, I added the sentiment, using dimensionals and adhered the gold flowers to the front of the card, using glue dots. 

Lastly, I adhered a sequin to the center of each gold flower, a few pearls, and the Basic White panel to the inside of the card.

Thanks for stopping by and taking a quick peek. Contact Me for more information on my cards or Stampin' Up!

Click on the headers above and satisfy your curiosity.

Please share, like, pin, tweet, or comment. Please take the time to FOLLOW and SUBSCRIBE to my blog.

HAPPY STAMPING!

Wednesday, May 24, 2023

His Love

As you savor that chocolate bunny, think of the reason you are celebrating Easter. Here is a clean and simple card to remind you of the true reason to celebrate. Thoughts?


Stamps:
   Rejoice in Him

Paper:
   Pool Party A-2
   Basic White 5-3/8 x 4-1/8, 5-1/4 x 4 (2)
   Texture Chic DSP 3/4 x 4 (2)
   Soft Succulent 2-1/2 x 1-1/2 

Ink:
   Pool Party
   Evening Evergreen
   Tuxedo Black Memento

Technique:
   Brushing/Sponging

Accessories:
   Brushes/Sponges
   Adhesive
   Dimensionals
   Paper Snips

First, I stamped the image of Jesus in the center of a Basic White panel, using Tuxedo Black Memento ink.

I then stamped the leaves, using Evening Evergreen ink.

Next, I brushed some Pool Party ink around the Jesus image, leaving white surrounding him. You can sponge the ink on with a sponge, if you do not have a brush. 

I then adhered a strip of Texture Chic DSP to the top and the bottom of the Basic White panel.

This was then adhered to the 5-3/8 x 4-1/8 Basic White matte, and then onto the Pool Party card front.

Next, I stamped the sentiment onto a piece of Soft Succulent card-stock, using Tuxedo Black Memento ink. Using my paper snips, I cut around the sentiment to get rid of any straight edge and to add a bit of interest to it. 

Lastly, I adhered the sentiment with dimensionals and added the other Basic White panel to the inside of the card.

Thank you for stopping to take a peek. Contact Me if you have any questions.

Click on Shop Now and browse through all things Stampin' Up! Start your wish list or order your favorites today. I included a HOST CODE for you to use if you like. Use it only if your product total is less than $150. You can find it in the right sidebar.

Join Me and get the best bang for your buck.

Do you want everything at your fingertips without having to look for it? Subscribe to Paper Pumpkin. Want more choices? Check out the Kit Collection.

One last thing, share, like, pin, tweet, and comment. Don't forget to FOLLOW and SUBSCRIBE to my blog. Okay, that was more than one thing.

HAPPY STAMPING!

Thursday, May 11, 2023

Rejoice in Him

While bunnies are cute and chocolate is delicious, let's not forget the true meaning of Easter. Thoughts? 


Stamps:
   Rejoice in Him

Paper:
   Soft Suede A-2
   Basic White 5-3/8 x 4-1/8, 1-1/2 x 3-1/4, Scraps, 5-1/4 x 4 (Inside)
   Texture Chic DSP 5-1/4 x 4
   Pool Party 3 x 3-3/4
   Soft Succulent 1-1/4 x 1-3/4 or Scrap

Ink:
   Tuxedo Black Memento
   VersaMark

Technique:
   Heat Embossing
   Dry Embossing
   Die Cutting

Accessories:
   Framed Florets Dies
   Black Embossing Powder
   Dimensionals
   Adhesive
   Stampin' Seal

First, I stamped my image on the 1-1/2 x 3-3/4 inch Basic White panel. I also stamped the dove on a small scrap of Basic White. I used Tuxedo Black Memento ink for both of these.

I then fussy cut the dove and put it aside. I then ran the White image through the die cutting machine, using the Framed Florets Dies.

Next, I took the Pool Party panel and ran it through the die cutting/embossing machine as well. I made sure the Basic White fit nicely inside the Pool Party frame.

I then took the scrap of Soft Succulent and stamped the sentiment, using VersaMark. I applied Black embossing powder and heat set it, using my heating tool. I then playfully cut around it. You can easily use a punch or die cut as well.

Finally, I assembled the card. I adhered the DSP panel to a Basic White matte and then onto the Soft Suede card front.

I laid out the sentiment, image, and dove on the front panel. I then attached the image and embossed frame using liquid adhesive. The dove and sentiment were added with dimensionals.

Lastly, I adhered the Basic White panel to the inside of the card.

Thank you so very much for being here. I appreciate you taking the time to glance at my work. Please Contact Me if I can be of service.

Are you interested in Stampin' Up! products to make your own cards? Shop Now and have a look-see. I placed a HOST CODE for you to use if you do not earn your own rewards. It is sitting in the right sidebar.

Do you like surprises? Subscribe to Paper Pumpkin and receive all you need to complete the monthly project. The cost is less than $25. Check it out.

Join Me and become privy to everything Stampin' Up! Receive a discount on all of your personal orders. Personally, I love SALES!

Please share, like, pin, tweet, or comment. Do not forget to FOLLOW and SUBSCRIBE to my blog.

HAPPY STAMPING!