Showing posts with label Eyelets. Show all posts

Saturday, June 29, 2024

Hippest Waterfall

Watch a person's face light up as they pull on the twine to reveal how these happy hippos dance in celebration. What do you think? 


Stamps:
   Hippest Hippos

Paper:
   Sahara Sand 5-1/4 x 8 score @ 4", 1-7/8" Sq. (4)
   Berry Burst 5-1/2 x 4-1/4, 3/4 x 4
   Purple 9 x 2 scored @ 2", 2-3/4", 3-1/2", 4-1/4"
   Daffodil Delight 2" Sq.
   Only Orange 2" Sq.
   Bermuda Bay 2" Sq.
   Melon Mambo 2" Sq.

Ink:
   Tuxedo Black Memento

Markers:
   Personal Choice

Technique:
   Waterfall

Accessories:
   Eyelets (3)
   Baker's Twine
   Adhesive

I followed the steps at SCS Tutorials for the Waterfall Card. They do an excellent explanation with pictures for you to follow along.

First, I randomly stamped all the hippos on the Sahara Sand card front, using Tuxedo Black Memento.

I then stamped a different hippo on each of the 1-7/8" Sahara Sand squares and colored them, using various markers.

Next, I adhered the Sahara Sand squares to a colored 2" square and laid them out on my table in the order I wanted them to appear on the card.

I scored the long purple piece and adhered the squares onto it, keeping them in order. Note that only the top of the square is attached to the strip.

Next, I placed this strip on the card front to see where I should attach the Berry Burst strip. I did not adhere the hippos yet. You want to make sure the strip is somewhat in the center of the card. I removed the strip and attached the Berry Burst strip to the card front only, using two eyelets.

I then adhered the strip permanently onto the Berry Burst strip as shown in the instructions from the link above.

Lastly, I added an eyelet at the bottom of the strip and threaded some twine for pulling the waterfall card down. I left the inside blank for a handwritten message to be added when it is given.

Here are the pictures of the rest of the squares:


Thank you so very much for taking the time to stop and glance at my work. If you have any questions or suggestions, please Contact Me. I do appreciate your time.

If you need any supplies, or you are curious to know just how much these products cost, click on Shop Now and satisfy your curiosity. A HOST CODE is available for you to use in case you did not earn your own rewards. You can find it in the right sidebar.

Do you want the best value for your buck? Join Me and reap all of the rewards. I will be more than happy to assist you. Check it out and note that there are no hidden agendas.

Wait! Don't leave. If you just want to try it and see, then subscribe to Paper Pumpkin. You will receive a kit with everything you need to create a project. Check out the Kits Collection for more choices.

I would love for you to take a minute to share, like, pin, tweet, or comment. Please FOLLOW and SUBSCRIBE to my blog. Let me know what you think below in the comments.

HAPPY STAMPING!

Thursday, April 11, 2024

Thank You Raspberry

Here is a blast into the past. The only thing current on this clean and simple card is the Basic White panel found on the inside of the card, the Basic Black matte used behind the DSP, and the glue that holds it all together. Thoughts? 


Stamps:
   Sketch It

Paper:
   Rose Red A-2
   Basic Black 5-3/8 x 4-1/8
   Raspberry Tart DSP 5-1/4 x 4, 3/4 x 4
   Basic White 5-1/4 x 4 (Inside)

Ink:
   Tuxedo Black Memento

Technique:
   Eyelet Setting

Accessories:
   Rose Red Circle Eyelets (2)
   Regals Candy Dots (Rose Red)
   Adhesive

First, I adhered the DSP panel onto the Basic Black matte.

I then stamped the strip of DSP with the sentiment and added it to the DSP panel, using two eyelets.

Next, I added the panel to the Rose Red card front.

Lastly, I added a few Rose Red Candy Dots to the card front and adhered a Basic White panel to the inside of the card.

Thank you for being here and taking the time to look at my blog entry. Contact Me if you need anything related to Stampin' Up!

If you would like to Shop Now, you can check out all that is new, current, and on-sale! I have included a HOST CODE in the right sidebar, if you would like to use it.

Notice that we offer a monthly subscription called Paper Pumpkin. Check it out and see if it is for you. The Kits Collection also offers a variety of kits at varying prices.

In order to get the most value for your dollar, you will want to Join Me and become part of my team. Click on the link and see if you are interested.

I would love for you to take a few minutes and share, like, pin, tweet, or comment. Don't forget to FOLLOW and SUBSCRIBE to my blog.

HAPPY STAMPING!

Monday, August 14, 2023

Fishy Retirement One

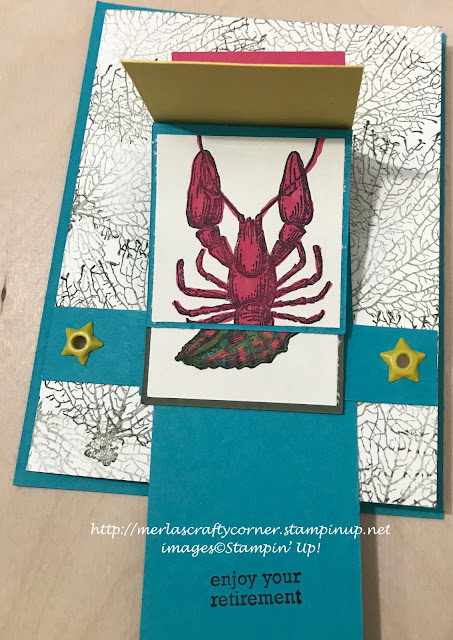
Pull on the Baker's Twine and flip through all of the images, like a waterfall. Surprisingly, every age group enjoys pulling on that twine and being entertained with the images. What do you think? 


Did you have fun sliding down the waterfall?

Stamps:
   By the Tide
   Itty Bitty Greetings

Paper:
   Bermuda Bay 5-1/2 x 4-1/4, 9 x 2, 3/4 x 4, 2" Sq.
   Very Vanilla 5-1/4 x 8, 1-7/8" Sq. (4)
   Always Artichoke 2" Sq.
   Daffodil Delight 2" Sq.
   Melon Mambo 2" Sq.

Ink:
   Always Artichoke
   Archival Basic Black

Markers:
   Always Artichoke
   Bermuda Bay
   Daffodil Delight
   Melon Mambo

Technique:
   Waterfall

Accessories:
   Star Eyelets
   Bermuda Bay Thick Baker's Twine
   Tacky Tape 
   Adhesive

I followed the tutorial found at SCS for the Waterfall Card

Thanks so much for reading through my blog today. Contact Me if I can answer anything for you, or if you would like to buy any of my cards.

If you would like to buy your own products and make your own cards click on Shop Now and browse current merchandise. I have placed a HOST CODE for you to use if you do not earn any rewards on your own. It is located in the right sidebar.

Our monthly subscription to Paper Pumpkin is affordable and flexible. The cost is less than $25 monthly. Check out the Kits Collection for more options at varying prices.

Join Me and become part of a team. Check out the benefits and decide if it is for you.

Please share, like, pin, tweet, or comment. Don't  forget to FOLLOW and SUBSCRIBE to my blog.

HAPPY STAMPING!

Friday, December 25, 2020

Welcome, Baby

 Remember when we had to guess the gender of the baby? There were no "reveal" parties. So, we bought items for the baby in neutral tones like yellow and green. Here is a waterfall card using some cute baby images. 


Stamps:
   Baby Firsts
   Mini Mates
   Hardwood

Paper:
   Daffodil Delight 5-1/2 x 4-1/4, 9 x 2, 3/4 x 4
   Very Vanilla 5-1/4 x 8, 1-7/8" Sq. (4)
   Rose Red 2" Sq.
   Tempting Turquoise 2" Sq.
   Old Olive 2" Sq.
   Tangelo Twist 2" Sq.

Ink:
   Mint Macaron
   Archival Basic Black
   Various Markers

Technique:
   Waterfall

Accessories:
   Old Olive Baker's Twine
   Star Eyelets
   Eyelet Setting Tools
   Adhesive

There is a tutorial for this waterfall technique on SplitCoast Stampers. You can find it HERE

Thank you for visiting. I do love company. Feel free to Contact Me if you have any questions.

Explore current products, promotions, and all of the opportunities, just click on Shop Now. A HOST CODE is available in the right sidebar for those of you who do not earn your own rewards.

For those of you who like kits with everything you need to complete a project, we offer Paper Pumpkin. Your monthly cost is less than $25.

Join Me and become my newest team member. I look forward to meeting you.

Please take a minute to share, like, pin, tweet, or comment. Do not forget to FOLLOW and SUBSCRIBE to my blog.

HAPPY STAMPING!


Sunday, October 4, 2020

Yesterday

 Not everyone has a crystal vase waiting for flowers to fill it. Often, we have to grab whatever container is nearby. This is usually a pitcher of some sort. What do you think?


Stamps:
   Country Home

Paper:
   Cajun Craze A-2
   Country Lane DSP 5-1/4 x 4, 3-1/4 x 3-3/4
   Whisper White 5-1/4 x 4, 3-1/4 x 3-3/4

Ink:
   Blackberry Bliss
   Archival Basic Black

Markers:
   Basic Black
   Cajun Craze
   Calypso Coral
   Cherry Cobbler
   Early Espresso
   Grapefruit Grove
   Mossy Meadow
   Poppy Parade
   Powder Pink
   Sahara Sand

Technique:
   Die Cutting
   Masking

Accessories:
   Layering Ovals Framelits Dies
   27" Crushed Curry Baker's Twine (2)
   4 Eyelets
   Eyelet Setter Tools
   Dimensionals
   Adhesive

First, I stamped my pitcher and flowers. I then colored in the image using various markers. I listed them above.

I then decided to mask the image and stamp the background, using the square tile stamp. Once I realized the mess I made, I die cut the image out using an oval from the Layering Ovals Framelits.

I adhered it onto a panel of DSP. I added an eyelet to each corner and ran some baker's twine through them. 

I adhered some DSP to the card base and added this smaller panel using dimensionals. 

I do my best to salvage and use everything I can. Of course, it is not always possible, and believe me I have thrown some horrendous mistakes in the trash bin. Still, I think I was able to salvage this one. What do you think? Would you throw up if you got this in the mail?

Thank you for stopping by and spending time with me. I appreciate your time and would love to hear your thoughts. Contact Me if you have any questions.

Click on the tabs above and explore the possibilities. 

Please share, like, pin, tweet, or comment. Do not forget to FOLLOW and SUBSCRIBE to my blog.

HAPPY STAMPING!

Sunday, July 26, 2020

Magic Fairy

Bring magic to your cards with this technique. You can find it at Split Coast Stampers: Magic Card. Here is my card showing the magic in progress.


Stamps:
   Fairy Celebration
   Pretty Petals

Paper:
   Pink Pirouette 8-1/2 x 10-1/2
   Almost Amethyst 4-1/4 x 5-1/2
   Ivory 3-3/4 x 5-1/2
   Blush Blossom 3-1/2 x 5
   Window Sheets (Acetate) 4 x 5-1/4 (2)

Ink:
   Black StazOn
   Pink Pirouette
   Various Markers

Technique:
   Magic Card

Accessories:
   Layering Ovals Framelits
   Stamparatus/MISTI/Stamp-a-ma-jig
   Sticky Tape/Fast Fuse
   Eyelet & Eyelet Setting Tool
   Ribbon
   Circle Punch

I followed the tutorial as explained on SCS. Just click on the words "Magic Card" and it will open the tutorial. There is also a video showing how to make the card. Enjoy.

Thank you so much for stopping by here and checking out my card. Please FOLLOW and SUBSCRIBE! Do not hesitate to share, like, pin, tweet, or comment. I look forward to seeing what you think.

Click on the buttons above and see current products and promotions. If you choose to place an order that is less than $150, the HOSTESS CODE on the right sidebar is waiting for your attention. Use it, if you please.

Contact Me if you have any questions or need my assistance.

HAPPY STAMPING!

Friday, May 1, 2020

Forever Friend

Has your friend been on your mind? Here is a simple, yet elegant, card to send using snail mail. With today's pandemic, everyone has been keeping their distance. This is a safe and wonderful way to connect.


Stamps:
   Forever Blossoms

Paper:
   Cajun Craze A-2
   Mango Melody 2-1/2 x 5
   Painted Seasons DSP 2 x 4-1/2

Ink:
   Cajun Craze

Technique:
   CAS

Accessories:
   Heirloom Frames Dies
   Basic Pearl Jewels
   Paper Snips
   Eyelets & Tools
   Adhesive

I used the oval shaped die from the Heirloom Frames Dies as a guide for my DSP oval.

Thank you for stopping by here and taking a peek. Let me know what you think. I appreciate your time and comments.

Shop Now for some Last-Chance Products. These are available while supplies last.

HAPPY STAMPING!


Wednesday, June 5, 2019

Country Thanks

Back in the day, nothing was thrown away. Everything was used many times until it was completely spent. Can you see what is being repurposed in this card?


Stamps: Country Home
Paper: Cajun Craze A-2, Country Lane Designer Series Paper 5 1/4 x 4, Whisper White 5 1/4 x 4 (Inside), 2 1/2 x 4
Ink: Crushed Curry, Blackberry Bliss
Markers: Blackberry Bliss, Cajun Craze, Crushed Curry, Early Espresso, Mint Macaron, Old Olive
Technique: Sponging
Accessories: Sponge, Eyelets, Adhesive

Note: The eyelets attached the Whisper White card stock to the Country Lane DSP. The Whisper White card stock was sponged after I stamped and colored the image with markers.

Shop Now for any of your stamping/paper crafting supplies. Contact Me with any questions or concerns.

I appreciate and encourage your comments, shares, likes, pins, and questions. 

Follow me if you enjoy seeing my creations. 

Thank you for taking the time to stop and take a peek. 

HAPPY STAMPING!