Thursday, October 31, 2024

Christmas Elfie

I matted my Artist Trading Card and added it to a note card. Now, I can send it to someone for Christmas. Thoughts? 


Christmas Elfie

Stamps:
   #Elfie

Paper:
   Whisper White Note Card
   Holiday Fancy Foil Vellum 3-1/4 x 4-3/4
   Real Red/Garden Green 2-3/4 x 3-3/4
   Basic White 2-1/2 x 3-1/2, 3-1/4 x 3-3/4 (Inside)

Ink:
   Tuxedo Black Memento
   Soft Sky 

Markers:
   Daffodil Delight
   Garden Green
   Petal Pink
   Real Red

Technique:
   ATC (Artist Trading Card)
   CAS

Accessories:
   Brights Enamel Shapes
   Glue Dots
   Adhesive

First, I stamped the image and sentiment on the 2-1/2 x 3-1/2 Basic White ATC card. 

I then colored in the image, using the markers listed above.

Next, I stamped the snow, using Soft Sky.

I then matted the card with Real Red or Garden Green.

Next, I adhered the Holiday Fancy Foil Vellum panel onto the Whisper White Note Card. I used glue dots in the center of the vellum where the image can cover them.

I then adhered the matted ATC panel to the center of the card.

Lastly, I added a few enamel shapes and adhered a Basic White panel to the inside of the note card.

Here is another card using the same products listed above. I'm sure you will note the differences. 

Christmas Elfie Too

Thank you so much for hanging out with me today. Contact Me if I can be of service.

Shop Now and browse some exciting new things. There is a HOST CODE in the right sidebar for you to use if you like.

Paper Pumpkin and the Kits Collection are two ways to get a quick fix for the Crafting Bug. Be careful, it is contagious, especially with family.

Join Me and flourish in the goodness that is Stampin' Up! I know you're thinking about it, or you would not have read this far. Check it out and let me know if you need anything.

Please share, like, pin, tweet, or comment. FOLLOW and SUBSCRIBE to my blog.

HAPPY STAMPING!

Wednesday, October 30, 2024

Seasonal Latte

I like having a hot beverage on a wintry day. What about you? 


Seasonal Latte

Stamps:
   Latte Love
   Peaceful Season

Paper:
   Calypso Coral/Pool Party A-2, 3 x 2-3/4
   Basic White 2-1/2 x 2-3/4, 5-1/4 x 4 (Inside)
   A Little Latte DSP 5-1/4 x 4

Ink:
   Calypso Coral
   Early Espresso
   Pecan Pie
   Pool Party

Markers:
   Calypso Coral/Pool Party

Technique:
   Die Cutting

Accessories:
   Peaceful Season Dies
   Adhesive-Backed Swirl Dots
   Dimensionals
   Adhesive

First, I stamped and die cut the sentiment, using the Peaceful Season Dies and the Early Espresso ink.

I then stamped the cup and colored it, using a marker.

Next, I adhered the Little Latte DSP panel onto the card front.

I then adhered the stamped cup panel on the left side of the card.

Next, I attached the sentiment, using dimensionals.

Lastly, I added a few adhesive-backed swirl dots and adhered a Basic White panel to the inside of the card.

I made another card, using Pool Party as the card base. What do you think?

Seasonal Latte Too

Thank you for being here! Contact Me if you have questions or need anything that is Stampin' Up! related.

Check out each of the headers above and see the fabulousness that is Stampin' Up! If you become a buyer, there is a HOST CODE located in the right sidebar for your use.

Please take a minute to share, like, pin, tweet, or comment. Plus, you want to take the time to FOLLOW and SUBSCRIBE to my blog.

HAPPY STAMPING!

Tuesday, October 29, 2024

White Christmas

I was challenged to create an all-white card, which I did. Yet, I found that I needed to do something to get the embossed tree images noticed. So, I added some glitter to the trees. What do you think? 


Stamps:
   None

Paper:
   Basic White A-2, 5-1/4 x 4 (2)

Ink:
   VersaMark

Technique:
   Dry Embossing

Accessories:
   Painted Trees 3D Embossing Folder
   Heat & Stick Powder
   Iridescent Glass Glitter
   Heat Tool
   Adhesive

First, I dry embossed a Basic White panel, using the Painted Trees 3D Embossing Folder. I passed it through the embossing machine twice to make sure I had an excellent impression. If you are afraid of your paper tearing, you may want to spray it with a tad of water to give it some flexibility.

I then took the VersaMark pad and gently patted the raised tree images.

Next, I added the heat & stick powder to the card front. I shook off the excess powder and put it back into its container.

I then took a soft brush and carefully brushed between the trees to make sure there was no heat & stick powder.

Next, I applied some heat to the panel, using my heat tool. You only want to get it hot enough to melt the powder. This is when it becomes like glue. If you heat it too much, then nothing will stick to it. 

I then applied the iridescent glitter to the trees. I shook off the excess and put it back in its container. Again, I took the soft brush and brushed off any excess between the trees. It is not perfect, but it is close enough.

Next, I adhered the panel to the card front.

Lastly, I adhered a Basic White panel to the inside of the card.

I thank you so much for stopping by here and checking out my card today. I do hope you liked it. Contact Me if you need more information.

If you would like to Shop Now, Stampin' Up! is always offering something special, especially for online shoppers. There are items that are advertised Exclusively Online, so check it out. You don't want to miss out on these wonderful items. 

The Kits Collection is always exciting. New Kits are introduced online and are available while supplies last. Prices vary, depending on the kit. You don't want to miss Paper Pumpkin. It is what I enjoy each month. Take a peek!

Join Me and cash in for the best deal available. No fine print to miss. Check it out and see if it may be for you.

Please take a few more minutes to share, like, pin, tweet, or comment. Don't forget to FOLLOW and SUBSCRIBE to my blog.

HAPPY STAMPING!

Monday, October 28, 2024

Metallic Birthday

I followed a tutorial for this technique. Although I found it easy to do, I was limited by the number of items I had to place on it. It is all covered by aluminum tape, so choices are limited. Thoughts? 


Stamps:
   None

Paper:
   Cajun Craze A-2
   Basic Black 5-3/8 x 4-1/8
   Basic White 5-1/4 x 4 (2)

Ink:
   Cajun Craze

Acrylic Paint:
   Black

Technique:
   Metal Foil Tape Art

Accessories:
   Aluminum Tape
   Wooden Shapes (Arrow, Heart, Triangle)
   Cork Letters (Project Life)
   Magic Mesh
   Stylus
   Sponge
   Paper Towels
   Brush
   Glue Dots
   Adhesive

I followed the video tutorial made by Jane France for Metal Tape Art. Enjoy!

I am so excited that you decided to pay me a visit. Please Contact Me if I can be of service.

Shop Now and enjoy looking at new products made especially for card making! There is a Host Code located in the right sidebar, if you care to use it.

If you are into kits, check out Paper Pumpkin and the Kits Collection. I am sure one of those will be right up your alley.

Still undecided? Join Me and find out what all of the fuss is about. Check it out today.

Please share, like, pin, tweet, or comment. FOLLOW and SUBSCRIBE to my blog.

HAPPY STAMPING!

Saturday, October 26, 2024

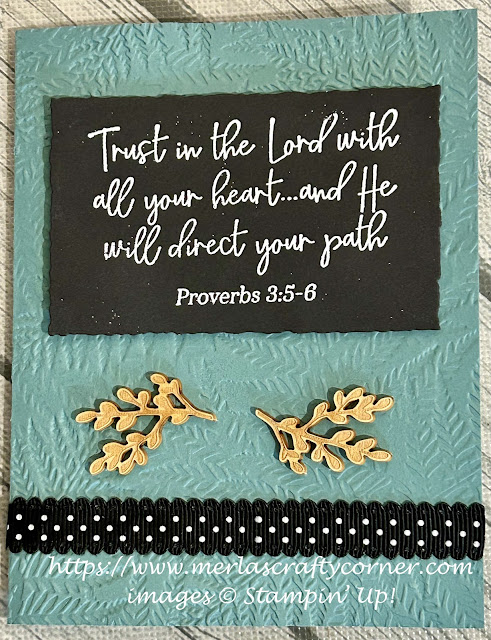
Proverbs

There are many techniques that can be used to make a card. My favorite is embossing. So, I heat and dry embossed on this card. What do you think? 


Stamps:
   You Are Beautiful

Paper:
   Lost Lagoon A-2
   Basic Black 2-1/2 x 3-7/8
   Basic White 5-1/4 x 4 (Inside)

Ink:
   VersaMark

Technique:
   Dry Embossing
   Heat Embossing

Accessories:
   White Embossing Powder
   Deckled Rectangles Dies
   Fern 3D Embossing Folder
   In Good Taste Elements
   Black Polka Dot Scalloped Ribbon 4-1/4"
   Embossing Buddy
   Dimensionals
   Mini Glue Dots
   Adhesive

First, I dry embossed the Lost Lagoon card front, using the Fern 3D Embossing Folder.

I then heat embossed the proverb on the Basic Black panel.
  1.    I rubbed down the panel with my embossing buddy.
  2.    I stamped the proverb, using VersaMark.
  3.    I applied white embossing powder to the panel.
  4.    I shook off the excess.
  5.    I applied heat with my heat tool.
  6.    I set it down to cool for a minute.

Next, I attached the heat embossed panel to the top of my card front, using dimensionals.

I then adhered the ribbon to the bottom of the card, using a strong adhesive. 

Next, I attached a couple of In Good Taste Elements, using glue dots.

Lastly, I added a Basic White panel to the inside of the card.

Thank you for stopping by here. Contact Me if you have questions or need anything Stampin' Up! related.

If you have a few minutes, Shop Now, and take a look at quality products and deals that may be happening today! There is a HOST CODE in the right sidebar, if you are interested.

If you like kits at your fingertips, then check out Paper Pumpkin and/or the Kits Collection. You will not regret it.

Want some company? Join Me and become a member of my team. I can't wait to meet you.

Please share, like, pin, tweet, or comment. Make sure you FOLLOW and SUBSCRIBE to my blog. This way you won't miss a thing! 

HAPPY STAMPING!

Friday, October 25, 2024

Good Tidings

Here is a clean and simple technique to use some of those 1/4" leftover strips from your stash. If you don't have the matching color, you can use Basic Black or Basic White. Thoughts? 


Stamps:
   Greetings of the Season

Paper:
   Evening Evergreen A-2, 1/4 x 4 (4)
   Cherry Cobbler 5-3/8 x 4-1/8
   Tidings of Christmas DSP 5-1/4 x 4
   Basic White 2-1/4" Sq., 5-1/4 x 4 (Inside)

Ink:
   Cherry Cobbler

Technique:
   Fractured Card/Shutter Card

Accessories:
   Holiday Basic Rhinestone Jewels
   Cherry Cobbler & Gold Satin Ribbon
   Glue Dots
   Adhesive

I followed the tutorial on You Tube by Lisa Curcio for her Faux Fractured Card. She does an amazing job explaining and showing this technique. 

The products and supplies I used for my card are listed above. 

Thank you kindly for stopping by here. Contact Me if I can be of service.

Take a quick look and Shop Now for new products and current sales. There is a Host Code in the right sidebar for your use, if you like.

If you just want a quick crafty fix, check out the Kits Collection or get a consistent dose with a Paper Pumpkin subscription.

Join Me and create a new friendship. We already have crafting in common!

Please take a few minutes to share, like, pin, tweet, or comment. Plus, you don't want to forget to FOLLOW and SUBSCRIBE to my blog.

HAPPY STAMPING!

Thursday, October 24, 2024

Fun Congratulations

This is a really fun card to make, and it stands up beautifully on its own. It is difficult to note this with the busy background paper I chose. Still, in real life, it is amazing! Thoughts? 


Stamps:
   Petal Palette
   Petite Petals

Paper:
   Basic White 7 x 6 scored @ 1-1/2 & 3, 7 x 1-1/2 scored @ 4 & 5-1/2 (3), Scraps
   Petal Passion DSP 1-3/8" Sq. (6), 3-7/8 x 1-3/8 (3), 3-7/8 x 5-7/8, 1-3/8 x 5-7/8 (2)
   Strawberry Slush 1-1/2 x 2 (3)
   Crushed Curry 1-1/2 x 2 (3) 

Ink:
   Bermuda Bay
   Crushed Curry
   Strawberry Slush
   Tuxedo Black Memento

Technique:
   Fun Z-Fold 
   Punching
   Die Cutting

Accessories:
   Petals & More Thinlits Dies
   Petite Petals Punch
   Clear Faceted Gems
   Brights Enamel Shapes
   Glue Dots
   Adhesive

To make this fun fold, I followed the instructions provided to us by Anita during our Falliday Fest 2024 Challenge: Fun Z-Fold

Thank you for being here and taking the time to look at my blog entry. Contact Me if you need anything related to Stampin' Up!

If you would like to Shop Now, you can check out all that is new, current, and on-sale! I have included a Host Code in the right sidebar, if you would like to use it.

Notice that we offer a monthly subscription called Paper Pumpkin. Check it out and see if it is for you. The Kits Collection also offers a variety of kits at varying prices.

In order to get the most value for your dollar, you will want to Join Me and become part of my team. Click on the link and see if you are interested.

I would love for you to take a few minutes and share, like, pin, tweet, or comment. Don't forget to FOLLOW and SUBSCRIBE to my blog.

HAPPY STAMPING!

Wednesday, October 23, 2024

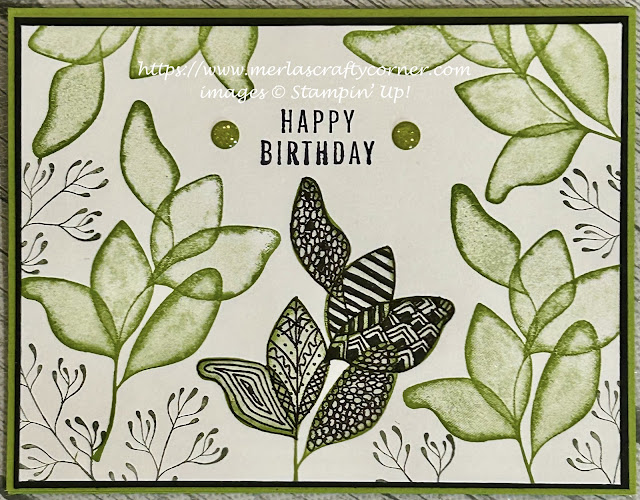
Translucent Zentangle

Zentangling can be fun, but it requires patience. Since you are drawing repetitive patterns, many find it calming, which in turn leads one to achieve a state of "zen." Thoughts? 


Stamps:
   Translucent Florals

Paper:
   Granny Apple Green A-2
   Basic Black 5-3/8 x 4-1/8
   Basic White 5-1/4 x 4 (2)

Ink:
   Granny Apple Green
   Tuxedo Black Memento
   Always Artichoke

Technique:
   Zentangling

Accessories:
   Micron 03 Archival Ink Pen
   Glitter Enamel Dots
   Adhesive

First, I stamped the sentiment, using Tuxedo Black Memento ink.

I then stamped the translucent leaves randomly around the card front, using Granny Apple Green.

Next, I stamped the smaller leaves in the blank spaces, using Always Artichoke ink.

Using the Micron 03 pen, I zentangled one cluster of leaves with different patterns.

Next, I adhered the panel onto a Basic Black matte and then onto the Granny Apple Green card front.

Lastly, I added a couple of Glitter Enamel Dots next to the sentiment and adhered a Basic White panel to the inside of the card.

Thank you so much for stopping by here and taking the time to peek at my latest creation. Contact Me for any further information.

If you have a few minutes, I suggest you Shop Now and check out all of our current deals. You don't want to kick yourself later for passing up the opportunity. There is a Host Code in the right sidebar if you care to use it.

If you want to feed your Crafty Bug that has been going around, subscribe to Paper Pumpkin. Check it out and see if it is for you.

Join Me and become my newest team member. It is the best deal around.

Please take some time to share, like, pin, tweet, or comment. I do appreciate all of your feedback. Don't forget to FOLLOW and SUBSCRIBE to my blog.

HAPPY STAMPING!

Tuesday, October 22, 2024

Lovely Thank You

Having designer paper that matches a stamp set makes card making easy and fun. Thoughts? 


Lovely Thank You


Stamps:
   Oh So Eclectic
   Keeping Tabs

Paper:
   Peekaboo Peach A-2
   Naturally Eclectic DSP 5-1/4 x 4
   Night of Navy 4-1/2 x 2-1/2, 1-1/4" Circle
   Basic White 2" Sq., 1" Circle, 5-1/4 x 4 (Inside)

Ink:
   Night of Navy
   Peekaboo Peach
   Soft Sky

Technique:
   2-Step Stamping
   Die Cutting
   Punching

Accessories:
   Eclectic Layers Thinlits Dies
   1" & 1-1/4" Circle Punch
   Clear Faceted Gems
   2016-2018 In Color Enamel Shapes
   Dimensionals
   Adhesive

First, I stamped and die cut all of the pieces:
   Peekaboo Peach Floral (2)
   Night of Navy Floral (1)
   Night of Navy Geometric Background
   Night of Navy Circle (1-1/4")
   Sentiment on Basic White circle (1") with Night of Navy ink.

I then adhered the Naturally Eclectic DSP panel onto the Peekaboo Peach card front.

Next, I attached the Night of Navy geometric background lattice to the card front.

I then attached the two Peekaboo Peach florals and the Night of Navy floral, using Dimensionals.

Next, I adhered the Basic White circle onto the Night of Navy circle and attached it to the card front, using dimensionals.

Lastly, I added a Clear Faceted Gem to each floral, an Enamel Shape to the sentiment, and adhered a Basic White panel to the inside of the card.

Here is another card using the same products, but with a different sentiment:

Lovely

Thank you for taking a peek. Please Contact Me for further information on Stampin' Up! or if you have questions.

Shop Now and browse our current products and promotions. There is a Host Code located in the right sidebar if your order is less than $150. Of course, you do not have to use it, but I would appreciate it.

Do you have the crafting bug? Subscribe to Paper Pumpkin and receive a monthly dose. The cost is $25, and you can buy it, skip it, or stop it. I must warn you. It can be addictive! I can't seem to stop!

Join Me and become a member of my team. Check out the benefits and gain the best value for your money. 

Don't forget to share, like, pin, tweet, or comment. Make sure to FOLLOW and SUBSCRIBE to my blog.

HAPPY STAMPING!