Friday, October 6, 2023

Berry Delightful

 I so enjoy making a card when Stampin' Up! hands us designer paper that is already stamped and coordinates beautifully with their products. The Delightful Floral DSP is available only while supplies last. Obviously, when they are sold out, I will just stamp and die cut my own with the Translucent Floral Bundle. So, I bought them all. This way, my fun is never-ending. What do you prefer: designer paper, stamp set, die cuts or all? 


Stamps:
   None

Paper:
   Berry Burst A-2
   Basic Black 5-3/8 x 4-1/8
   Basic White 5-1/4 x 4 (Inside)
   Delightful Floral DSP 5-1/4 x 4

Ink:
   None

Technique:
   CAS

Accessories:
   Tinsel Gems Four-Pack
   Adhesive

First, I cut the DSP panel and adhered it to a Basic Black matte and then onto a Berry Burst card front.

Next, I added a Basic White panel to the inside of the card.

Lastly, I added an embellishment from the Tinsel Gems Four Pack.

Here is another card, using Calypso Coral as a card base and another panel from the same 12 x 12 DSP sheet:

Berry Delightful Too

You can easily add a sentiment to the cards for a specific occasion. I chose to leave these alone to use as all occasion cards. 

Thank you for visiting. I do love company. Feel free to Contact Me if you have any questions.

Explore current products, promotions, and all of the opportunities. Just click on Shop Now. A HOST CODE is available in the right sidebar for those of you who do not earn your own rewards.

For those of you who like kits with everything you need to complete a project, we offer Paper Pumpkin. Your monthly cost is less than $25. Also, you might want to look at the new Kits Collection!

Join Me and become my newest team member. I look forward to meeting you.

Please take a minute to share, like, pin, tweet, or comment. Do not forget to FOLLOW and SUBSCRIBE to my blog.

HAPPY STAMPING!

Thursday, October 5, 2023

Moody Card

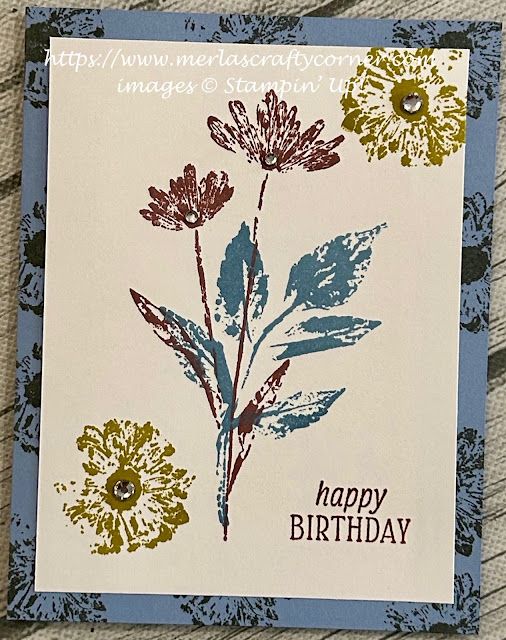
Make a card by simply stamping! Well, I did add a few rhinestones, but that's just me. What is your favorite embellishment? 


Moody Card


Stamps:
   Inked & Tiled

Paper:
   Boho Blue A-2
   Basic White 5 x 3-3/4, 5-1/4 x 4 (Inside)

Ink:
   Boho Blue
   Copper Clay
   Moody Mauve
   Pebbled Path
   Wild Wheat

Technique:
   CAS

Accessories:
   Basic Rhinestone Jewels
   Adhesive

First, I stamped the large flower in the center of the 5 x 3-3/4 Basic White panel, using Moody Mauve ink.

I then stamped the large leaves over the stem, using Boho Blue ink.

Next, I stamped the sentiment, using Copper Clay. (This first one did not include a sentiment.)

I then stamped the small flower in the background, using Wild Wheat ink.

Next, I stamped the Boho Blue card front with a small flower, using Pebbled Path ink. 

I then adhered the stamped panel onto the Boho Blue card front, and added a few rhinestones.

Lastly, I adhered a Basic White panel to the inside of the card.

Here are three other cards I made using the same products:

Moody Card Too


Moody Card Tre


Moody Card Quad

Thank you so very much for being here. I appreciate you taking the time to glance at my work. Please Contact Me if I can be of service.

Are you interested in Stampin' Up! products to make your own cards? Shop Now and have a look-see. I placed a HOST CODE for you to use if you do not earn your own rewards. It is sitting in the right sidebar.

Do you like surprises? Subscribe to our Paper Pumpkin and receive all you need to complete the monthly project. The cost is less than $25. Check it out.

Join Me and become privy to everything Stampin' Up! Receive a discount on all of your personal orders. Personally, I love SALES!

Please share, like, pin, tweet, or comment. Do not forget to FOLLOW and SUBSCRIBE to my blog.

HAPPY STAMPING!

Wednesday, October 4, 2023

Serene

Here is one of those large stamps that you can color with any medium you wish. I decided to use my watercolor crayons this time, but I think I may try my watercolor pencils next. What medium would you choose? 


Stamps:
   Calm & Quiet

Paper:
   Pacific Point A-2
   Basic Black 5-1/4 x 4
   Basic White 5-1/4 x 4 (Inside)
   Watercolor 5-1/4 x 4

Ink:
   Jet Black StazOn

Watercolor Crayons:
   Baja Breeze
   Basic Gray
   Chocolate Chip
   Crumb Cake
   Early Espresso
   Garden Green
   Pacific Point
   Soft Suede

Technique:
   Die Cutting
   Watercolor

Accessories:
   Deckled Rectangles Dies
   Aqua Painter
   Paper Towel
   Adhesive

First, I stamped my image in the center of a watercolor panel, using Jet Black StazOn ink.

I then colored the image, using my watercolor crayons. Stampin' Up! has discontinued these, but any medium will work. I listed the colors I used above. Browns were used on the wood, greens were used on the greenery, and the blues were used on the water and sky.

I then went over the image with my Aqua Painter to spread the watercolor crayons on the image. I kept a paper towel handy to dab at areas that needed it.

Next, I used the second to the largest deckled rectangle die to center my image and to give the edges an interesting look.

I then adhered the panel onto a Basic Black panel and then onto the Pacific Point card front. You will want to use whatever color matches one of your colors on your image for the card base.

Lastly, I adhered a Basic White panel to the inside of the card for a personal message. I left off a sentiment to keep the card as an all occasion card.

Thank you so much for spending time with me here. Contact Me if you have any questions.

Shop Now and take a look at all of our new products and current promotions. Please use the HOST CODE sitting in the right sidebar if you did not earn your own rewards.

Subscribe to Paper Pumpkin and keep your monthly cost below $25! Join Me and become my newest team member.

Either way, please share, like, pin, tweet, or comment. Do not forget to FOLLOW and SUBSCRIBE to my blog.

HAPPY STAMPING!