Wednesday, September 27, 2023

Silver Beauty

One of my favorite stamp sets is Beauty Abounds, even though it has been retired. I like the different images and it can so easily be arranged for countless occasions. It is a timeless set. Thoughts? 


Stamps:
   Beauty Abounds

Paper:
   Blackberry Bliss A-2
   Basic White 5-1/4 x 4 (2)
   Silver Glitter Scrap 1/4 x 5-1/4

Ink:
   Pool Party
   Blackberry Bliss

Technique:
   CAS

Accessories:
   Silver Metallic Pearls
   Adhesive

First, I stamped the sentiment, using Blackberry Bliss.

Using Pool Party ink, I stamped the Bokeh circles, both small and large, randomly on the Basic White panel.

Next, I stamped the flower flourish on all four sides of the panel, using Blackberry Bliss.

I then stamped a few butterflies to fill in any gaps on the panel.

Lastly, I added a few metallic pearls and adhered a Basic White panel to the inside of the card.

Thank you for being here! Contact Me if you have questions or need anything that is Stampin' Up! related.

Check out each of the headers above and see the fabulousness that is Stampin' Up! If you become a buyer, there is a HOST CODE located in the right sidebar for your use.

Please take a minute to share, like, pin, tweet, or comment. Plus, you want to take the time to FOLLOW and SUBSCRIBE to my blog.

HAPPY STAMPING!

Tuesday, September 26, 2023

3-D Daisy

Daisies can brighten up anyone's day. Here is a daisy to say thank you to someone for their thoughtfulness. When was the last time you sent someone a card instead of a text? 


Stamps:
   Daisy Delight

Paper:
   Blushing Bride A-2
   Basic White 5-1/4 x 4 (2), Scraps

Ink:
   Blushing Bride
   Crushed Curry
   Pear Pizzazz
   Pineapple Punch
   Pretty in Pink

Technique:
   Punching

Accessories:
   Daisy Punch
   Clear Faceted Gems
   Dimensionals
   Adhesive

First, I stamped my sentiment in Pear Pizzazz. I like to do this first, so that I do not mistakenly stamp over it or fail to leave enough room for it.

I then stamped daisies randomly in the background, using Pretty in Pink, Blushing Bride, and Pineapple Punch.

Next, I stamped the daisy twice on Basic White scraps, using Crushed Curry, and punched them with the Daisy Punch.

I adhered both of them together with a dimensional between them. Notice that I staggered them so the daisy was full.

Next, I added the daisy to the card front with a dimensional.

Lastly, I stamped a couple of stems with Pear Pizzazz, added a clear faceted gem, and adhered a Basic White panel to the inside of the card.

I thank you so much for stopping by here and checking out my card today. I do hope you liked it. Contact Me if you need more information.

If you would like to Shop Now, Stampin' Up! is always offering something special, especially for on-line shoppers. There are items that are advertised only on-line, so check it out. You don't want to miss out on these wonderful items.

The Kits Collection is always exciting. New kits are introduced on-line and are available while supplies last. Prices vary, depending on the kit. You don't want to miss Paper Pumpkin. It is what I enjoy each month. Take a peek!

Join Me and cash in for the best deal available. No fine print to miss. Check it out and see if it may be for you.

Please take a few more minutes to share, like, pin, tweet, or comment. Don't forget to FOLLOW and SUBSCRIBE to my blog.

HAPPY STAMPING!

Monday, September 25, 2023

Bubbly Octopus

Here is a technique to amuse your inner child. Unfortunately, mine did not want to play nicely, so I stamped a few bubbles in the end. Check it out. You might have better luck than I did. The tutorial is at: Soap Bubble Art


Stamps:
   Sea of Textures
   Bubble Over
   Sheltering Tree

Paper:
   Soft Suede A-2
   Watercolor 5-1/4 x 4
   Whisper White 5-1/4 x 4 (Inside), Scrap

Ink:
   Baked Brown Sugar
   Melon Mambo
   More Mustard
   Mossy Meadow
   Soft Sky
   Tranquil Tide

Re-Inkers:
   Orchid Opulence
   Pacific Point
   Pixie Pink

Technique:
   Soap Bubble Art
   Die Cutting

Accessories:
   Under the Sea Framelits
   Dimensionals
   Straws
   Cups
   Napkins
   Dish Soap
   Adhesive

First, I took the watercolor paper panel and tried to do the tutorial mentioned above, but my bubbles did not come up at all. So I watercolored the background, using Orchid Opulence, Pacific Point, and Pixie Pink. I let the panel dry and then stamped directly onto it.

I stamped the sand, using Baked Brown Sugar.

I then stamped the tall grasses with Tranquil Tide.

Next, I stamped the sentiment and the small plants, using Mossy Meadow.

I then stamped and die cut the Octopus, using Melon Mambo and Under the Sea Framelits.

I attached the octopus with a few dimensionals.

I then added the net, using More Mustard and added a few bubbles with a bit of Soft Sky.

Lastly, I adhered the panel to the Soft Suede card front and adhered the Whisper White panel to the inside of the card.

I am so excited that you decided to pay me a visit. Please Contact Me if I can be of service.

Shop Now and enjoy looking at new products made especially for card making! There is a HOST CODE located in the right sidebar, if you care to use it.

If you are into kits, check out Paper Pumpkin and the Kits Collection. I am sure one of those will be right up your alley.

Still undecided? Join Me and find out what all the fuss is about. Check it out today.

Please share, like, pin, tweet, or comment. FOLLOW and SUBSCRIBE to my blog.

HAPPY STAMPING!

Sunday, September 24, 2023

Thank U Sunrise

Use your coloring book pages as backgrounds for your cards. Thoughts? 


Stamps:
   For Being You
   Layered Letters Alphabet

Paper:
   Tempting Turquoise A-2
   Tangerine Tango 3-3/4" Sq.
   Daffodil Delight 3-1/2 x 3-7/8
   Basic White 5-1/4 x 4 (Inside)

Ink:
   Archival Basic Black

Markers:
   Various Copic Markers (Personal Choice)
   Tangerine Tango - Lettering

Technique:
   Coloring

Accessories:
   Sequins from Verve Stamps
   Adhesive

First, I stamped the Daffodil Delight panel, using Archival Basic Black.

I then used the Tangerine Tango marker to color the word, "THANK."

Next, I adhered this panel onto the Tangerine Tango matte.

I adhered the coloring book panel onto the Tempting Turquoise card front, and added the sentiment panel to the center of the card.

Lastly, I added a few sequins and adhered the Basic White panel to the inside of the card.

Thanks for stopping by and taking a quick peek. Contact Me for more information on my cards or Stampin' Up!

Click on the headers above and satisfy your curiosity.

Please share, like, pin, tweet, or comment. Please take the time to FOLLOW or SUBSCRIBE to my blog.

HAPPY STAMPING!

Wednesday, September 20, 2023

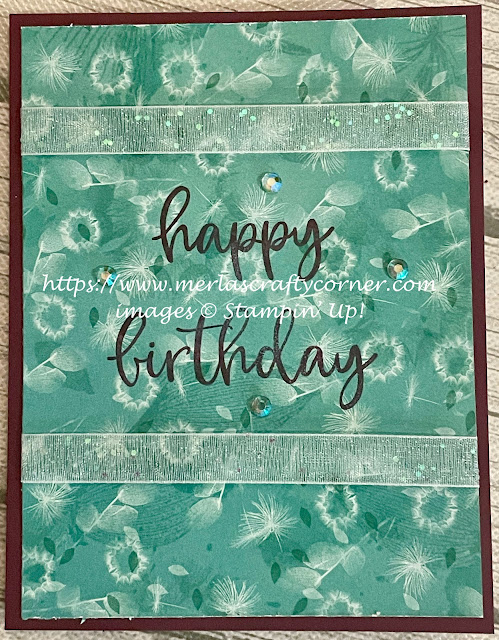
Pretty Birthday

I made two cards using the same stamp set and supplies. The layout can make a difference. What do you think? 


Pretty Birthday


Pretty Birthday Too


Stamps:
   Biggest Wish

Paper:
   Blackberry Bliss A-2
   Pretty Prints DSP 5-1/4 x 4
   Basic White 5-1/4 x 4 (Inside)

Ink:
   Blackberry Bliss

Technique:
   CAS

Accessories:
   Glittered Organdy Ribbon 6" (2)
   Iridescent Rhinestone Basic Jewels
   Stampin' Seal +
   Glue Dots
   Adhesive

First, I stamped the sentiment on the DSP as shown above.

I then added ribbon to the card front. I used Stampin' Seal+ to adhere the ribbon on the back of the DSP. 

Next, I adhered the DSP panel onto the card front.

Lastly, I added a few rhinestones and adhered the Basic White panel to the inside of the card.

Thank you for being here! Contact Me if you have questions or need anything that is Stampin' Up! related.

Check out each of the headers above and see the fabulousness that is Stampin' Up! If you become a buyer, there is a HOST CODE located in the right sidebar for your use.

Please take a minute to share, like, pin, tweet, or comment. Plus, you want to take the time to FOLLOW and SUBSCRIBE to my blog.

HAPPY STAMPING!

Tuesday, September 19, 2023

Geographic Hello

I used a simple watercolor technique to create a unique background. Give it a try! You won't be disappointed. 


Stamps:
   Itty Bitty Greetings

Paper:
   Cameo Coral A-2
   Basic Black 5-3/8 x 4-1/8
   Watercolor 5-1/4 x 4
   Basic White 5-1/4 x 4 (Inside)

Ink:
   Archival Basic Black
   Cameo Coral
   Perfect Plum
   Lucky Limeade
   Taken With Teal

Markers:
   Fine Tip Black

Technique:
   Topographic Watercolor

Accessories:
   2016-18 In-Color Enamel Shapes
   Adhesive

First, I wet my watercolor panel by misting it with water.

I then added blots of pigment, changing colors, until all of the areas were covered.

I let it dry completely.

Next, I outlined each of the color areas, using a very fine tip black marker.

I then stamped a little hello in the center and highlighted it with a few enamel shapes. 

I adhered the panel onto a Basic Black matte, and then onto the Cameo Coral card front.

Lastly, I adhered a Basic White panel to the inside of the card.

I thank you so much for stopping by here and checking out my card today. I do hope you liked it. Contact Me if you need more information.

If you would like to Shop Now, Stampin' Up! is always offering something special, especially for on-line shoppers. There are items that are advertised only on-line, so check it out. You don't want to miss out on these wonderful items.

The Kits Collection is always exciting. New kits are introduced on-line and are available while supplies last. Prices vary, depending on the kit. You don't want to miss Paper Pumpkin. It is what I enjoy each month. Take a peek!

Join Me and cash in for the best deal available. No fine print to miss. Check it out and see if it may be for you.

Please take a few more minutes to share, like, pin, tweet, or comment. Don't forget to FOLLOW and SUBSCRIBE to my blog.

HAPPY STAMPING!

Monday, September 18, 2023

Zen Zebra

Use a Zentangle technique on your images. It will definitely draw attention to your images. I gave it a go. What do you think? 


Stamps:
   Zoofari
   Proud Peacock
   Teeny Tiny Wishes

Paper:
   Apricot Appeal A-2, 2 x 2-1/4 (2), 1-3/4 x 2-1/4
   Whisper White 1-3/4 x 2 (2), 1-1/2 x 2, 5-1/5 x 4 (Inside)
   Almost Amethyst DSP 5-1/4 x 4

Ink:
   Archival Basic Black
   Apricot Appeal

Technique:
   Zentangling
   Dry Embossing
   Sponging

Accessories:
   Zig Zag Embossing Folder
   Corner Rounder Punch
   Sponge
   Adhesive
   Big Shot

There is a tutorial on this technique at Split Coast Stampers: Zentangling. You will find written instructions as well as a video. 

First, I stamped each image on a Whisper White panel.

I then drew or doodled patterns on each one.

Next, I rounded the corners with a Corner Rounder Punch.

I sponged each panel, and adhered them to an Apricot Appeal matte.

Next, I dry embossed the Almost Amethyst DSP panel and adhered the image panels, overlapping a corner as shown above.

I then adhered the panel onto the Apricot Appeal card front and added a Whisper White panel to the inside of the card.

Lastly, I added a sentiment above the cat. This can be left off and used as an all occasions card.

I am so excited that you decided to pay me a visit. Please Contact Me if I can be of service.

Shop Now and enjoy looking at new products made especially for card making! There is a HOST CODE located in the right sidebar, if you care to use it.

If you are into kits, check out Paper Pumpkin and the Kits Collection. I am sure one of those will be right up your alley.

Still undecided? Join Me and find out what all the fuss is about. Check it out today.

Please share, like, pin, tweet, or comment. FOLLOW and SUBSCRIBE to my blog.

HAPPY STAMPING!

Sunday, September 17, 2023

Girly Card

I was challenged to create a "girly" card, and the first thing that popped into my brain was shoes. Why is everyone obsessed with shoes? Some will judge someone based on their shoes. Ugh, I prefer comfortable over style. Thoughts? 


Stamps:
   Best Day Ever

Paper:
   Strawberry Slush A-2
   So Saffron DSP 5-1/4 x 4
   Basic White 5-1/4 x 4 (Inside)
   Coloring Book Image 

Ink:
   Archival Basic Black
   Strawberry Slush

Markers:
   Various Copics

Technique:
   Coloring

Accessories:
   Image from Whimsical Escapes Coloring Book
   Retro Fresh Washi Tape
   Basic Rhinestone Jewels
   Fine Tip Glue Pen
   Adhesive

First, I colored the image of the shoe found in a Whimsical Escapes Coloring Book. I then fussy cut it out. 

I then added a strip of Retro Fresh washi tape to the bottom of the So Saffron DSP panel.

Next, I adhered the shoe image as shown above, using the Fine Tip Glue Pen.

I then stamped the sentiment on the top right of the DSP panel.

Next, I stamped the flowers, using Strawberry Slush ink.

I then adhered the DSP panel onto the Strawberry Slush card front.

Lastly, I added a few rhinestones to the card front and adhered the Basic White panel to the inside of the card.

Thanks for stopping by and taking a quick peek. Contact Me for more information on my cards or Stampin' Up!

Click on the headers above and satisfy your curiosity.

Please share, like, pin, tweet, or comment. Please take the time to FOLLOW and SUBSCRIBE to my blog.

HAPPY STAMPING!

Saturday, September 16, 2023

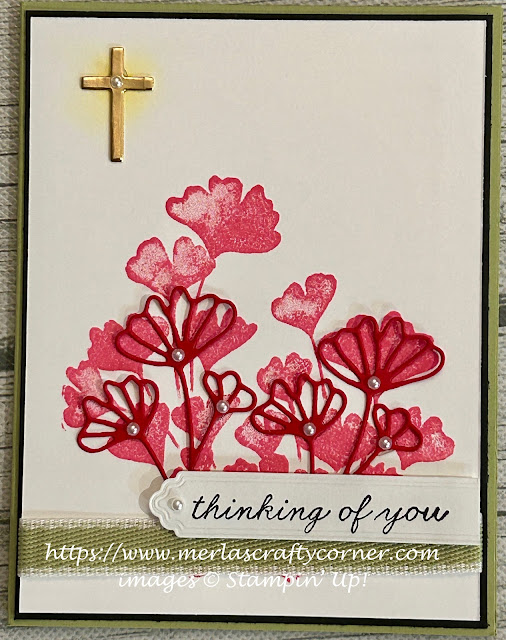
Red Ginkgo

The die cuts do not match the stamped image, but they add so much to the card. What do you think? 


Stamps:
   Ginkgo Branch

Paper:
   Pear Pizzazz A-2
   Basic Black 5-3/8 x 4-1/8
   Basic White 5-1/4 x 4 (2), 1 x 4 Trim to Edge
   Real Red 2 x 2-1/2
   Gold Foil Paper Scraps

Ink:
   Barely Banana
   Polished Pink
   Tuxedo Black Memento

Technique:
   Die Cutting

Accessories:
   Ginkgo Branch Dies
   Cross of Hope Framelits
   Pear Pizzazz Ribbon 6"
   Basic Pearl Jewels
   Dimensionals
   Glue Dots
   Adhesive

First, I die cut the Ginkgo Branch, using the Ginkgo Branch Dies and Real Red cardstock.

I then die cut a small gold foil cross, using the Cross of Hope Framelits.

Next, I stamped the Ginko Branch, using Polished Pink ink. I adhered the die cut to the top of it.

I then sponged a small circle of Barely Banana on the top left corner of the card front. I adhered the cross on top of the sponged circle. 

Next, I stamped and die cut the sentiment, using the Ginkgo Branch dies and Tuxedo Black Memento ink.

I then adhered the ribbon to the bottom of the branch and wrapped it around the panel.

I attached the sentiment with a couple of dimensionals and trimmed off the right edge. 

I then adhered the panel to the Basic Black matte and then onto the Pear Pizzazz card front. 

Lastly, I added a few pearls to the card front and adhered the other Basic White panel to the inside of the card.

Thank you for stopping by here. Contact Me if you have questions or need anything Stampin' Up! related.

If you have a few minutes, Shop Now, and take a look at quality products and deals that may be happening today! There is a HOST CODE in the right sidebar, if you are interested.

If you like kits at your fingertips, then check out Paper Pumpkin and/or the Kits Collection. You will not regret it.

Want some company? Join Me and become a member of my team. I can't wait to meet you.

Please share, like, pin, tweet, or comment. Make sure you FOLLOW and SUBSCRIBE to my blog. This way you won't miss a thing!

HAPPY STAMPING!