Thursday, August 31, 2023

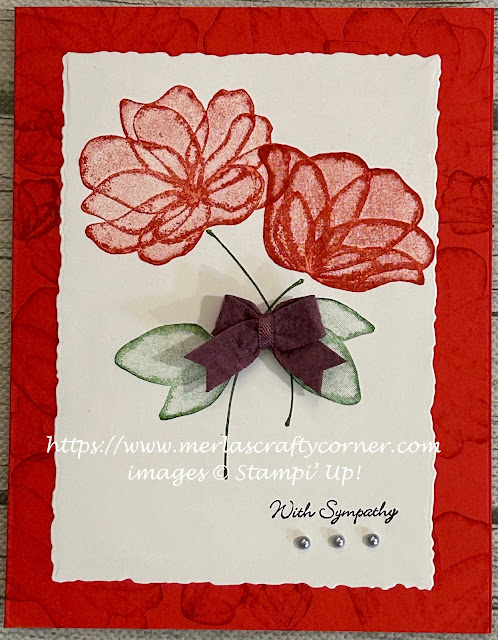
Happy Florals

This distINKtive stamp set is beautiful. I do not have any skills except to ink and stamp. The stamp does all of the work beautifully. What do you think? 


Stamps:
   Translucent Florals
   Hope & Prayer

Paper:
   Gray Granite A-2
   Basic White 3-1/2 x 3, 4 x 1, 5-1/4 x 4 (Inside)

Ink:
   Garden Green
   Gray Granite
   Tuxedo Black Memento

Technique:
   Die Cutting
   Punching

Accessories:
   Translucent Floral Dies
   Deckled Rectangles Dies
   Happy Labels Pick a Punch
   Classic Matte Dots
   Glue Dots
   Dimensionals
   Adhesive

First, I stamped and die cut the Garden Green leaves using the Translucent Floral Dies.

I then stamped and punched out the sentiment, using Tuxedo Black Memento ink and the Happy Labels Pick a Punch.

Next, I grabbed the Gray Granite ink and stamped the leaves on the Gray Granite card front.

I then attached the Garden Green die cut leaves, using dimensionals and added the sentiment with a glue dot on the left and a dimensional on the right. 

Lastly, I added a few Classic Matte Dots and adhered the Basic White panel to the inside of the card.

Thank you so very much for being here. I appreciate you taking the time to glance at my work. Please Contact Me if I can be of service.

Are you interested in Stampin' Up! products to make your own cards? Shop Now and have a look-see. I placed a HOST CODE for you to use if you do not earn your own rewards. It is sitting in the right sidebar.

Do you like surprises? Subscribe to our Paper Pumpkin and receive all you need to complete the monthly project. The cost is less than $25. Check it out.

Join Me and become privy to everything Stampin' Up! Receive a discount on all of your personal orders. Personally, I love SALES!

Please share, like, pin, tweet, or comment. Do not forget to FOLLOW and SUBSCRIBE to my blog.

HAPPY STAMPING!
 

All Occasion Floral Too

I used a laser-cut specialty panel for this card front. Thoughts? 


Stamps:
   None

Paper:
   Very Vanilla A-2, 3-1/2 x 4-3/4, 5-1/4 x 4 (Inside)
   Delightfully Detailed Laser-Cut Specialty Paper

Ink:
   None

Technique:
   Dry Embossing

Accessories:
   Floral Affection Embossing Folder
   Basic Rhinestone Jewels
   Glue Dots
   Adhesive

First, I dry embossed a 3-1/2 x 4-3/4 Very Vanilla panel, using the Floral Affection Embossing Folder.

I attached this to the back of the Delightfully Detailed Laser-Cut Specialty Paper Panel, using glue dots. I made sure the embossed panel was centered on the panel and showing through the oval opening.

Next, I added adhesive to this panel and adhered it to the center of the Very Vanilla card front.

I then added a border strip on each side of this panel.

Lastly, I added a few rhinestones and a Very Vanilla panel to the inside of the card.

Thank you for being here and taking the time to look at my blog entry. Contact Me if you need anything related to Stampin' Up!

If you would like to Shop Now, you can check out all that is new, current, and on-sale! I have included a HOST CODE in the right sidebar, if you would like to use it.

Notice that we offer a monthly subscription called Paper Pumpkin. Check it out and see if it is for you. The Kits Collection also offers a variety of kits at varying prices.

In order to get the most value for your dollar, you will want to Join Me and become part of my team. Click on the link and see if you are interested.

I would love for you to take a few minutes and share, like, pin, tweet, or comment. Don't forget to FOLLOW and SUBSCRIBE to my blog.

HAPPY STAMPING!

Wednesday, August 30, 2023

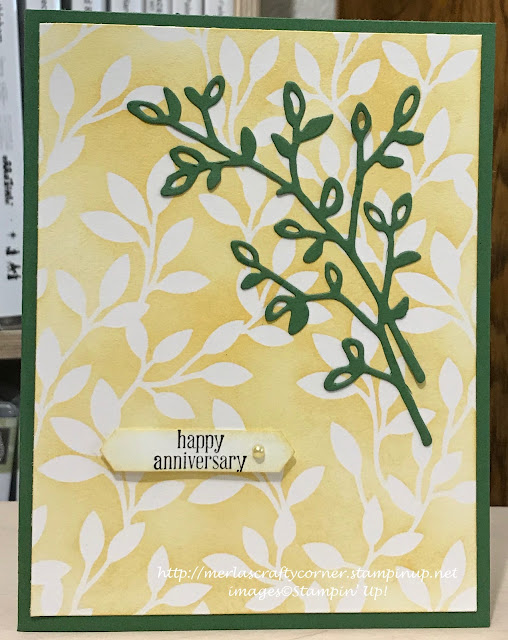
Golden Anniversary

Anniversaries should be celebrated. In today's fast-paced world, where technology provides us information instantaneously, few take the time to create, nourish, and grow a relationship with someone face-to-face in real time. So, take the time to celebrate all milestones. Golden anniversaries are truly rare. Thoughts? 


Stamps:
   Itty Bitty Greetings

Paper:
   Garden Green A-2, Scraps
   Irresistibly Yours DSP 5-1/4 x 4
   Whisper White 5-1/4 x 4 (Inside), Scrap

Ink:
   Archival Basic Black
   So Saffron

Technique:
   Sponging
   Die Cutting

Accessories:
   Petals & More Thinlits
   Classic Label Punch
   Sponge
   Paper Towel
   Share What You Love Artisan Pearls
   Dimensionals
   Adhesive
   Fine Tip Glue Pen

First, I sponged So Saffron ink on the Irresistibly Yours DSP panel and then wiped it with a paper towel. This allows the embossed leaves to shine through, since they resist the ink. 

I then took a scrap of Garden Green cardstock and die cut the leaves, using the Petals & More Thinlits.

Next, I stamped the sentiment on a scrap of Whisper White and punched it, using the Classic Labels Punch.

I then adhered the sponged DSP panel onto the Garden Green card front.

I attached the Garden Green leaves, using the Fine Tip Glue Pen.

Next, I added the sentiment with a couple of dimensionals.

Lastly, I added a pearl, and adhered a Whisper White panel to the inside of the card.

Thank you so much for spending time with me here. Contact Me if you have any questions.

Shop Now and take a look at all of our new products and current promotions. Please use the HOST CODE sitting in the right sidebar if you did not earn your own rewards.

Subscribe to Paper Pumpkin and keep your monthly cost below $25! Join Me and become my newest team member.

Either way, please share, like, pin, tweet, or comment. Do not forget to FOLLOW and SUBSCRIBE to my blog.

HAPPY STAMPING!

Tuesday, August 29, 2023

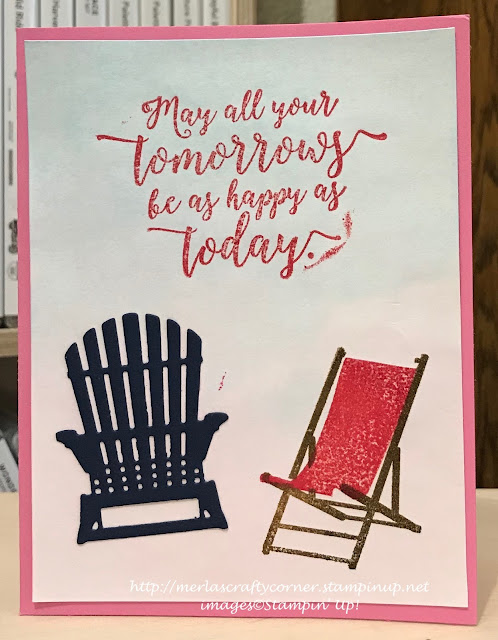
Relaxing Chairs

Relax and mellow out on one of these chairs. Sit by the pool or on a sandy beach and enjoy the cool breeze. When was the last time you sat down and relaxed? 


Stamps:
   Colorful Seasons 

Paper:
   Pixie Pink A-2
   Basic White 5-1/4 x 4 (2)
   Night of Navy Scrap

Ink:
   Soft Suede
   Real Red
   Pacific Point
   Orchid Opulence

Technique:
   Watercolor
   Die Cutting

Accessories:
   Seasonal Layers Thinlits Dies
   Adhesive

First, I watercolored a Basic White panel using Pacific Point and Orchid Opulence. I set it aside for a bit to dry.

I then die cut a chair out of a scrap of Night of Navy.

I took the watercolored panel and laid the blue chair on the left side, while I stamped the sentiment above it, using Real Red.

I then stamped the frame of the chair on the right side, using Soft Suede. I stamped the inside of the chair with Real Red.

Next, I adhered the die cut chair to the watercolored panel.

I then adhered the panel onto the Pixie Pink card front and adhered the other Basic White panel to the inside of the card.

Thank you so much for stopping by here and taking a quick look-see. If you have any questions or need my assistance, Contact Me.

Shop Now and take a look at all of our new products and current promotions. Please use the HOST CODE sitting in the right sidebar if you did not earn your own rewards.

If you want to craft, but keep your costs below $25 a month, check out Paper Pumpkin. It just might be what you are looking for at the moment.

Join Me and become the newest member of my team. Remember there are no hidden agendas or penalties for giving it a go. Don't pass this opportunity to save.

You've come this far, so please share, like, pin, tweet, or comment. I appreciate your time and efforts. Let me know your thoughts and leave all of your questions behind. Do not forget to FOLLOW and SUBSCRIBE to my blog.

HAPPY STAMPING!

Monday, August 28, 2023

Salt in the Meadow

Create a unique background with this salted watercolor technique. Thoughts? 


Stamps:
   In the Meadow

Paper:
   Marina Mist A-2
   Glossy Paper 5-1/4 x 4
   Basic White 5-1/4 x 4 (Inside)

Ink:
   Archival Basic Black
   Marina Mist
   Pumpkin Pie
   Garden Green
   Crushed Curry
   Tip Top Taupe

Technique:
   Salted Background

Accessories:
   Salt
   Aqua Painter
   Adhesive
   Water Spray Bottle

I followed the tutorial on SCS: Salted Background

Once the background was dried, I took the salt off the panel and stamped my images, using In the Meadow stamp set. 

I then adhered the panel to the Marina Mist card front and adhered the Basic White panel to the inside of the card.

Thank you so much for stopping by here and spending a few minutes of your day with me. I appreciate your time. Contact Me if you have any questions, need a demonstrator, or just want to stamp or share ideas.

Shop Now and enjoy browsing products and promotions. I have a HOST CODE in the right sidebar in case you did not earn your own rewards.

Do not miss the opportunity to Join Me and become the newest member of my team.

Paper Pumpkin should not be ignored. I enjoy putting my kit together monthly.

Take a few more minutes and share, like, pin, tweet, or comment. I would love to see what you really think. Do not forget to FOLLOW and SUBSCRIBE to my blog.

HAPPY STAMPING!

Sunday, August 27, 2023

Sympathy Flora

All I added was a bit of ribbon, a golden cross, and a sentiment. Thoughts? 


Stamps:
   Something Fancy

Paper:
   Night of Navy A-2
   Fancy Flora DSP 5-1/4 x 4
   Basic White 5-1/4 x 4 (Inside)
   Gold Foil Scrap

Ink:
   Evening Evergreen

Technique:
   Die Cutting

Accessories:
   Cross of Hope Framelits
   3/8" Pool Party Grosgrain Ribbon - 20"
   Adhesive
   Fine Tip Glue Pen

First, I cut the Fancy Flora DSP to size.

I then wrapped the 20" of ribbon around the lower part of the DSP and tied it off in a bow.

Next, I stamped the sentiment, using Evening Evergreen and Something Fancy stamp set.

I die cut a gold foil cross and adhered it above the sentiment. I used the Cross of Hope Framelits and the Fine Tip Glue Pen.

I then adhered the panel onto the Night of Navy card front and added the Basic White panel to the inside of the card.

Thank you so much for dropping by here. Contact Me if you have any questions.

Click on all of the tabs above and explore products, promotions, and opportunities.

Please take the time to share, like, pin, tweet, or comment. Do not forget to FOLLOW and SUBSCRIBE to my blog.

HAPPY STAMPING!

Saturday, August 26, 2023

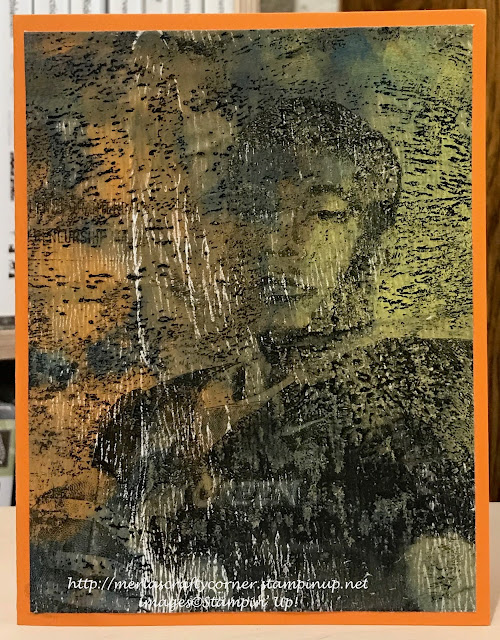
Hey Gorgeous

Sometimes things do not turn out as we intended. Can you even see her? What do you think? Trash? Even the greats have incomplete works. The problem is that I did finish mine...I just looked and somehow, sometime, somewhere, someone bought it. It is gone! It must be true: One person's trash is another man's treasure. Would you have bought it? 


Stamps:
   None

Paper:
   Pumpkin Pie A-2
   Whisper White 5-1/4 x 4 (2)

Ink:
   Acrylic Paint

Technique:
   Pop Art Prints From Your Gel Plate

Accessories:
   Brayer
   Gel Plate
   Adhesive
   High Glossy Magazine Print

I tried to follow this tutorial: Pop Art Prints from Your Gel Plate on You Tube 

I think my print was not glossy enough to make a complete transfer. Or maybe I did something else wrong. Give it a try and let me know your result.

Are you one of those crafty individuals that has little EXTRA time, money, or room? Join Me, Contact Me, or take the time to Shop Now and check out the Paper Pumpkin, New Kits Collection, and On-line Exclusives. Yup, it is always being changed, depending on inventory and new products. Don't miss a thing.

If you liked my card today, please share, like, pin, tweet, or comment. You also want to FOLLOW or SUBSCRIBE to my blog.

HAPPY STAMPING!

Friday, August 25, 2023

Pearly Slider

Don't forget to use those discontinued items sitting on your shelves. If you are like me, your shelves, stacks, or boxes of discontinued or retired items is much LARGER than the current, available while supplies last, hot trendy items. So, although I am a current Stampin' Up! demonstrator, I like to use everything in my craft room, including the discontinued items. I think there are still some of you out there who have these same items and want some ideas on using them. What do you think of this one? 


Stamps:
   Rooted in Nature

Paper:
   Groovy Guava A-2
   Chocolate Chip 5-3/8 x 4-1/8
   Afternoon Tea DSP 5-1/4 x 4
   Whisper White 3-3/4 x 3-1/4, 5-1/4 x 4 (Inside)

Ink:
   Chocolate Chip

Technique:
   Die Cutting

Accessories:
   Antique Brass Hodgepodge Hardware
   Basic Pearl Jewels
   Stitched Labels Framelits Dies
   1/4" Chocolate Chip Ribbon
   Dimensionals
   Glue Dot
   Fast Fuse
   Adhesive

First, I stamped and die cut my sentiment, using Chocolate Chip ink and the Stitched Labels Framelits Dies.

I then adhered the DSP panel onto a Chocolate Chip matte. 

Next, I threaded the Chocolate Chip ribbon through an Antique Brass slider, and wrapped the ribbon around the panel, making sure the slider landed in the center of the panel. I adhered the ribbon to the back of the panel, using Fast Fuse.

I then attached the panel to the Groovy Guava card front.

Next, I added the die cut sentiment to the top part of the card front, using dimensionals.

Lastly, I added a pearl in the center of the slider with a glue dot and adhered a Whisper White panel to the inside of the card. If the slider is moving, you can add a glue dot underneath it to hold it in place.

Howdy and thank you for dropping by here. Contact Me if you need anything.

Shop Now and take a look at items that are Exclusively On-Line! You do not want to miss them. 

Did you know that Paper Pumpkin and the Kits Collection make the perfect gift? Heck, I say, gift yourself one today! Check them out.

Join Me and become part of my team. Take a look at today's offering and see if it is for you.

Please share, like, pin, tweet, or comment. Do not forget to FOLLOW and SUBSCRIBE to my blog.

HAPPY STAMPING!

Thursday, August 24, 2023

Snowy Trees

 I added snow on these trees with a white gel pen. What do you think? 


Stamps:
   Peaceful Pines
   More Merry Messages

Paper:
   Whisper White A-2, 5-1/4 x 4 (Inside)
   Real Red 5-1/4 x 4
   All Is Calm DSP 5 x 3-3/4
   Pear Pizzazz Scraps

Ink:
   Pear Pizzazz
   Real Red

Technique:
   Die Cutting

Accessories:
   Perfect Pines Framelits Dies
   White Gel Pen
   Adhesive

First, I stamped and die cut the trees, using Perfect Pines Framelits and scraps of Pear Pizzazz.

I added snow, using a white gel pen.

I stamped a sentiment on the top of a 5 x 3-3/4 All Is Calm DSP panel, using Real Red ink.

Next, I adhered the trees to the DSP panel and trimmed down any parts that hung past the panel.

I then adhered the panel onto a Real Red panel and then onto the Whisper White card front.

Lastly, I added a Whisper White panel to the inside of the card.

Thank you so much for hanging out with me today. Contact Me if I can be of service.

Shop Now and browse some exciting new things. There is a HOST CODE in the right sidebar for you to use if you like.

Paper Pumpkin and the Kits Collection are two ways to get a quick fix for the Crafting Bug. Be careful, it is contagious, especially with family.

Join Me and flourish in the goodness that is Stampin' Up! I know you're thinking about it, or you would not have read this far. Check it out and let me know if you need anything.

Share, like, pin, tweet, or comment. FOLLOW and SUBSCRIBE to my blog.

HAPPY STAMPING!

Wednesday, August 23, 2023

Peek-a-Boo Florals

I like to mix the old with the new. After all, I only buy what I truly like, so I have to use it until it is all gone. What do you think? 


Stamps:
   Translucent Florals
   Teeny Tiny Wishes

Paper:
   Poppy Parade A-2
   Basic White 5-1/4 x 4 (2)

Ink:
   Poppy Parade
   Garden Green
   Fresh Fig

Technique:
   Die Cutting

Accessories:
   Deckled Rectangles Dies
   Metallic Pearls
   2017-2019 In-Color Bitty Bows
   Adhesive

First, I randomly stamped poppies on the card front, using Poppy Parade ink.

I then cut my Deckled Rectangular Frame in the center of a Basic White panel. I used the next to the largest die cut. I kept the left-over frame to use on another card.

Next, I stamped the poppies, using Poppy Parade ink. 

I stamped the stems and leaves, using Garden Green ink.

I used Fresh Fig to stamp the sentiment.

Next, I adhered the panel onto the card front.

Lastly, I added a Bitty Bow, a few pearls, and adhered a Basic White panel to the inside of the card.

Thank you for being here! Contact Me if you have questions or need anything that is Stampin' Up! related.

Check out each of the headers above and see the fabulousness that is Stampin' Up! If you become a buyer, there is a HOST CODE located in the right sidebar for your use.

Please take a minute to share, like, pin, tweet, or comment. Plus, you want to take the time to FOLLOW and SUBSCRIBE to my blog.

HAPPY STAMPING!